


Introduction
WebSocket communication enables real-time, bidirectional communication between clients and servers over a single, long-lived connection. AWS API Gateway, combined with AWS Lambda, provides a powerful serverless solution for managing WebSocket connections and handling events. This guide will walk you through the steps to set up WebSocket communication using AWS API Gateway and Lambda, including the use of $connect, $disconnect, $default, and custom routes.
Prerequisites
AWS account with permissions to create and manage API Gateway, Lambda functions, dynamodb and IAM roles.
Basic knowledge of AWS services and serverless architecture.
Architecture

Why You Need Each Route
$connect: This route is triggered when a client establishes a WebSocket connection. It allows you to perform tasks such as authentication, session management, or initialization.$disconnect: This route is triggered when a client disconnects from the WebSocket. It allows you to perform cleanup tasks or update the state of connected clients.$default: This route handles any messages that do not match other defined routes. It can be used for handling general messages or implementing fallback logic.Custom Routes: These routes allow you to define application-specific logic for handling different types of messages or events within your WebSocket API. We are going to create sendMessage route.
Step 1: Create Role for AWS Lambda
Go to AWS console and search for IAM
Navigate to Roles from left side panel
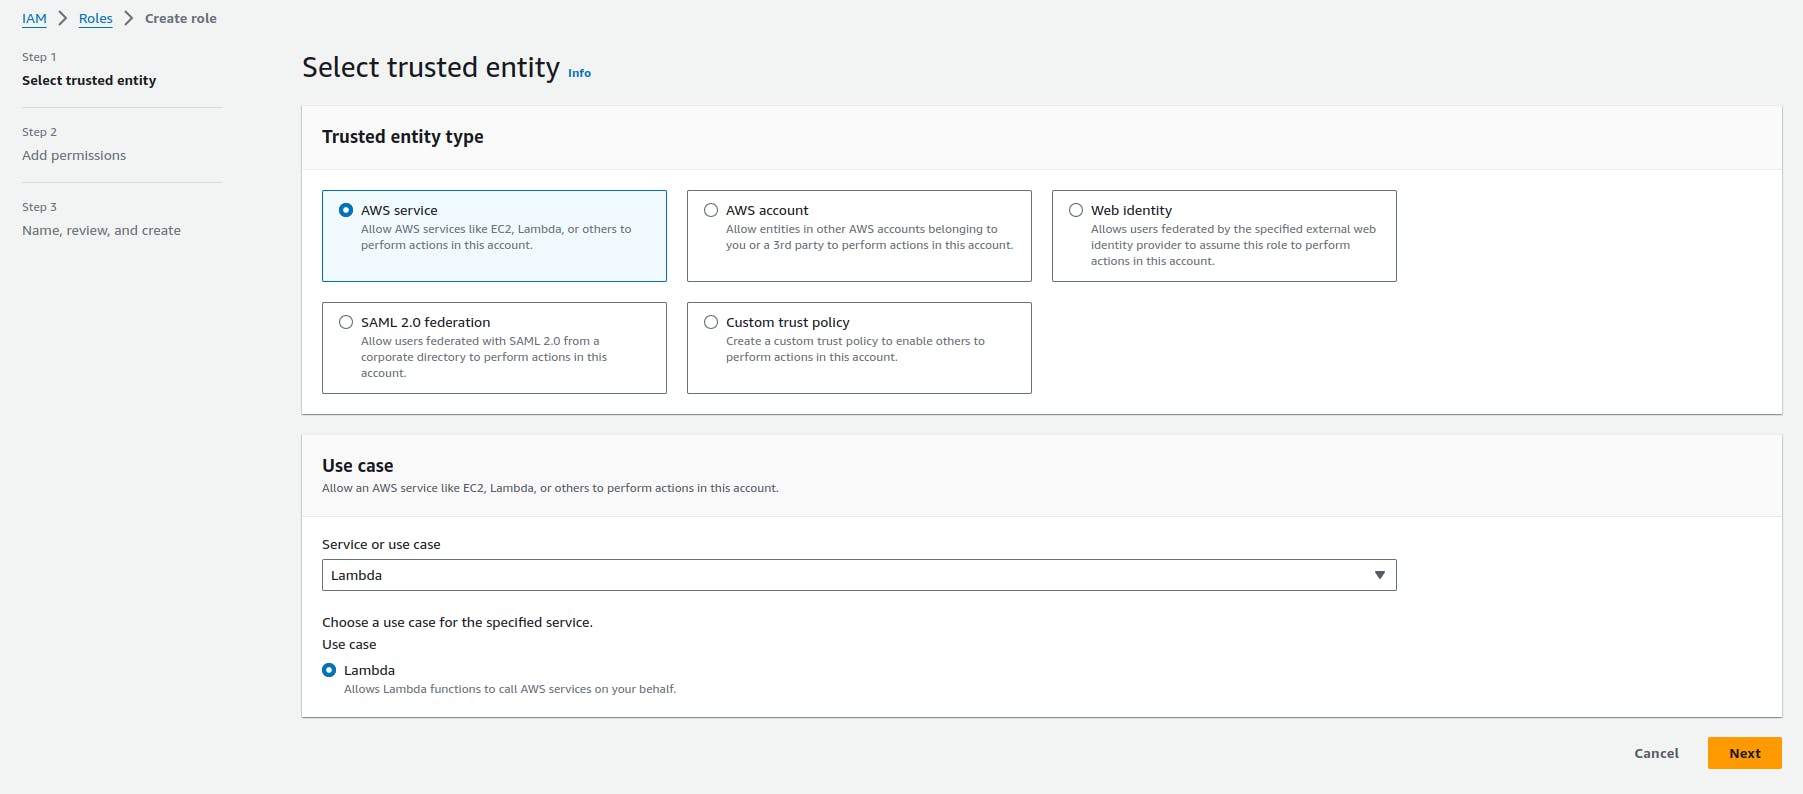
Click on create role
Select AWS service as a trusted entity and select Lambda as use case then click on Next
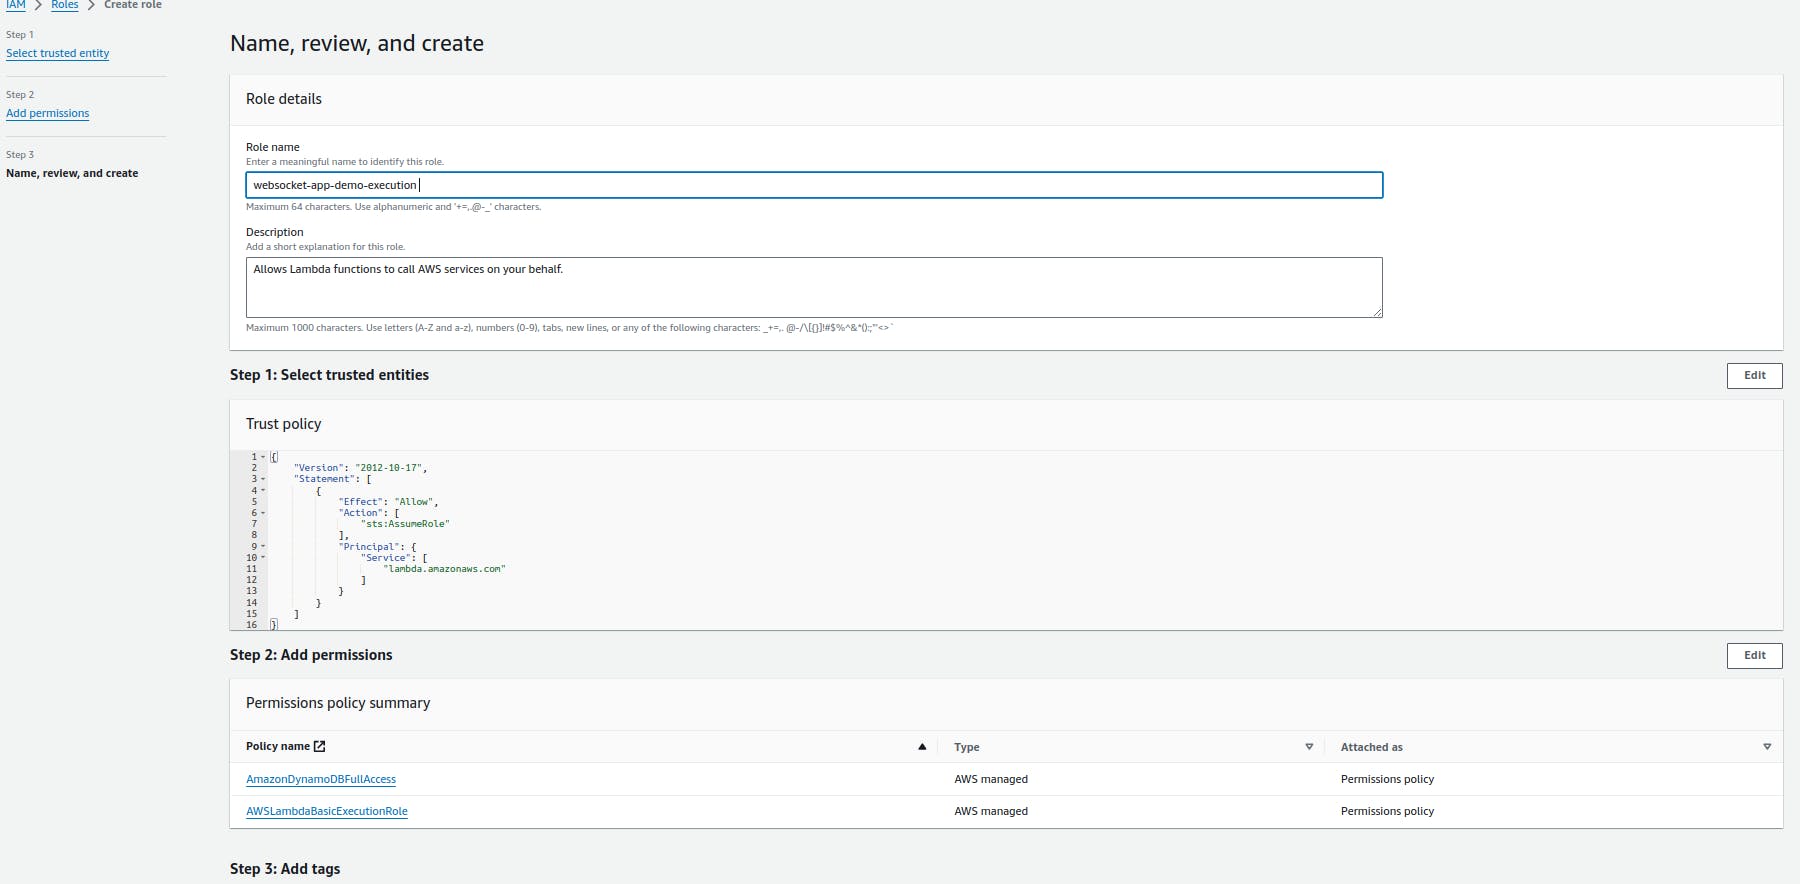
Add AmazonDynamoDBFullAccess and AWSLambdaBasicExecutionRole permissions
Give name as websocket-app-demo-execution in 3rd step and create a Rule
Once role is created, search for the role websocket-app-demo-execution and click on create inline policy to execute API from default Lambda which we will create in next steps

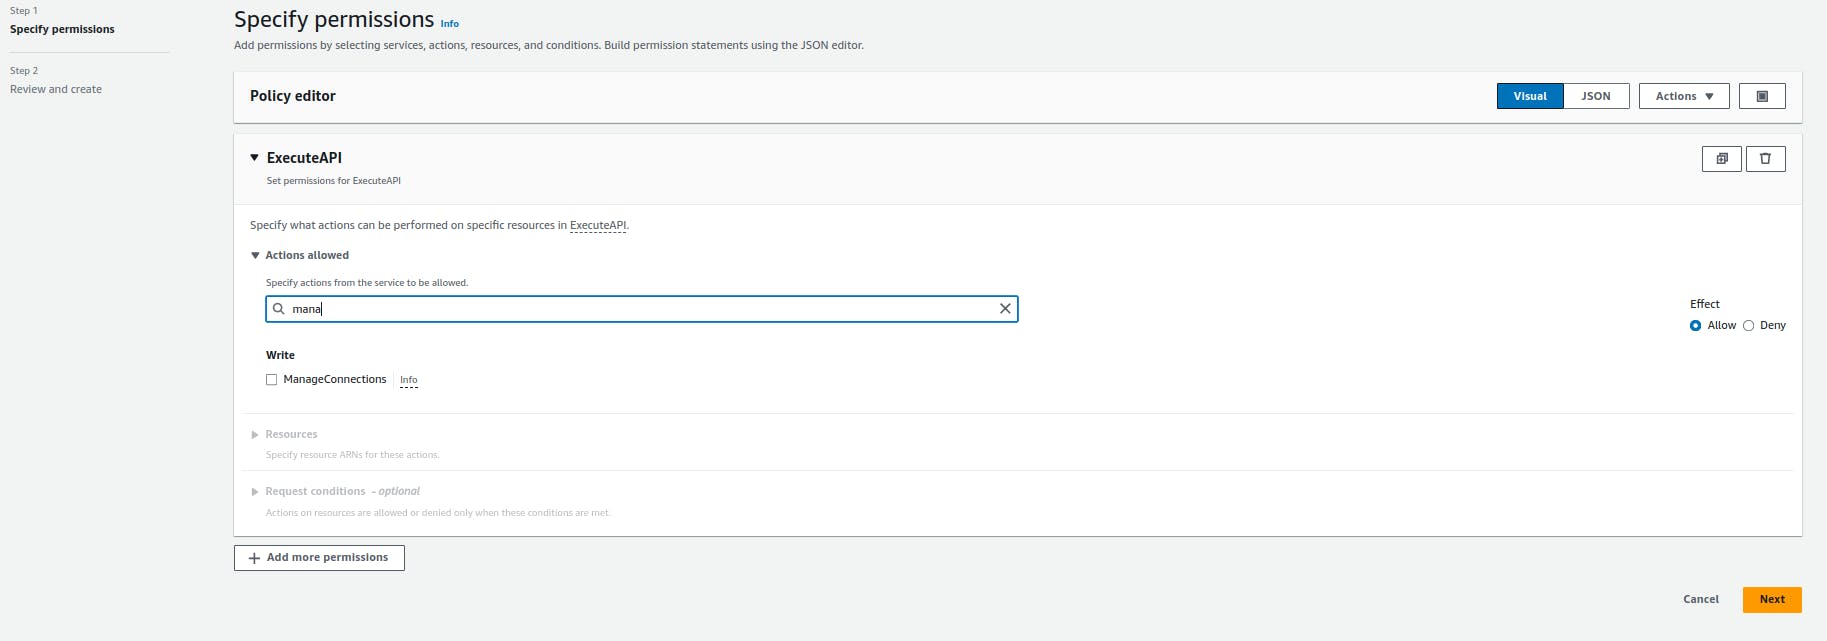
Select execute API service

From actions search for Managed Connections
Select All resource and click on Next
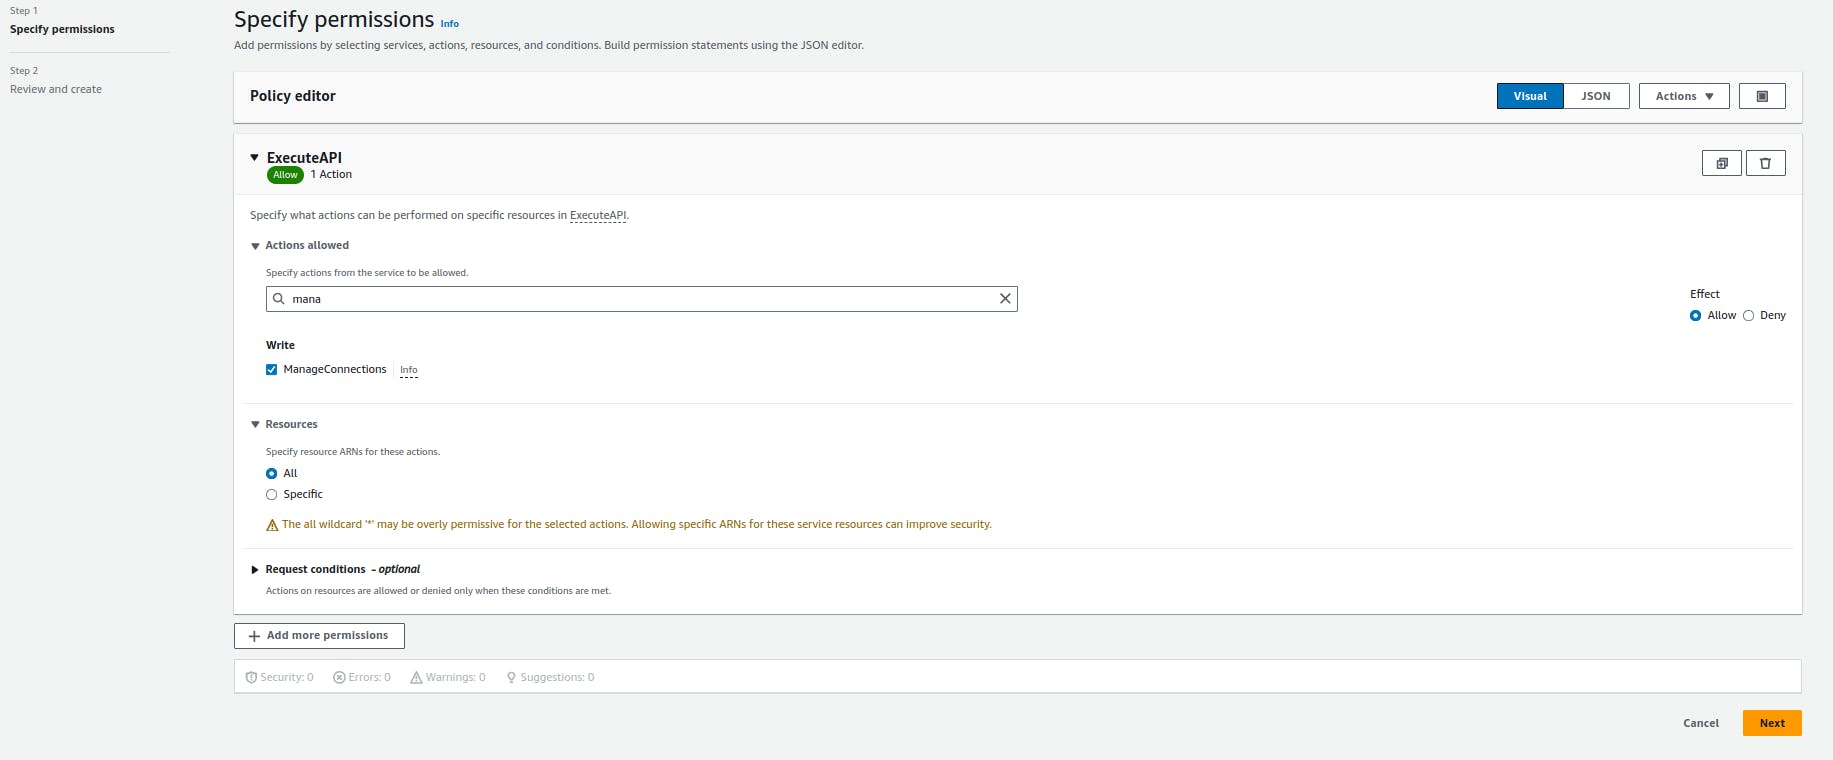
Provide name as ExecuteApiManageConnections and Create Policy

Now we are good to attach this role to every Lambda which we are going to create.
Step 2: Create DynamoDB Table
Whenever there is new connection with API gateway, AWS will create a new connection id which you will get in event (inside Lambda). You need to persist this connection id for further communication. Also you can persist custom identifier or any other user info along with this connection Id. We are going to use DynamoDB database for persistence.
Search for DynamoDB service in AWS console and select Tables option from Left side panel
Click on create Table
Provide table name as demo-websocket-app and connectionId as a partition key
If there is not going to be heavy traffic or overload on your table then select customize setting as Table setting, DynamoDB standard as Table class and on-demand capacity as Read/write capacity settings
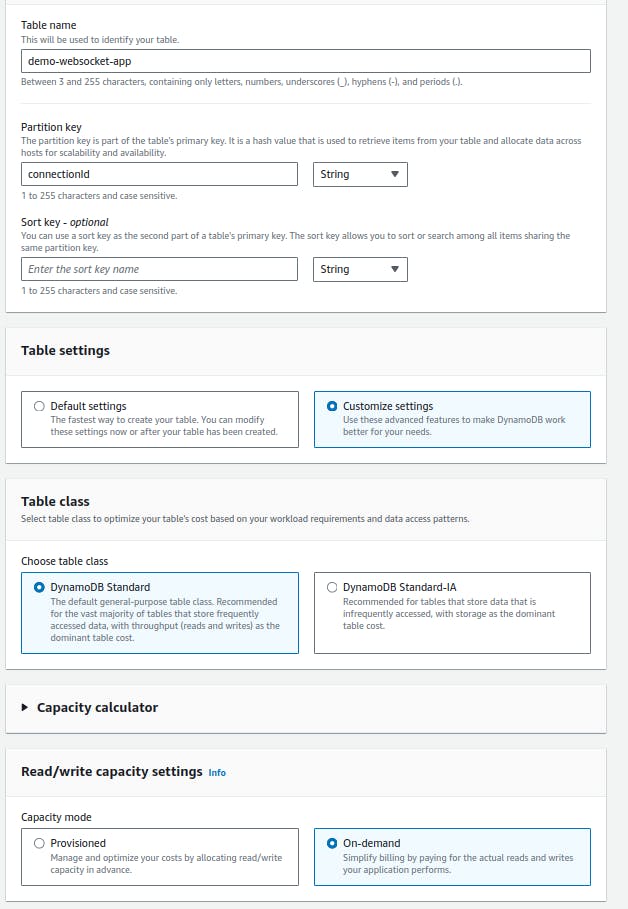
Click on create table
Creation of table will take few seconds, once it successfully get created you will see a message
Step 3: Create Connect Lambda Function
Create Lambda with name demo-websocket-app-connect to handle connect route
Select role websocket-app-demo-execution
Select Language as python 3.8

Write down below code in lambda_function.py which accept connection Id from event and persist into dynamo db table demo-websocket-app
import os
import boto3

# Initialize DynamoDB client
db = boto3.client('dynamodb', region_name='ap-south-1')
table_name = "demo-websocket-app"

def lambda_handler(event, context):
    try:
        # Put item into DynamoDB table
        db.put_item(
            TableName=table_name,
            Item={
                'connectionId': {'S': event['requestContext']['connectionId']}
            }
        )
    except Exception as e:
        return {
            'statusCode': 500,
            'body': str(e)
        }

    return {
        'statusCode': 200
    }
- Click on the deploy once you are done with the changes
Step 4: Create Disconnect Lambda Function
Create Lambda with name demo-websocket-app-disconnect to handle disconnect route
Select role websocket-app-demo-execution
Select Language as python 3.8

Write down below code in lambda_function.py which accept connection Id from event and delete from dynamo db table demo-websocket-app
import os
import boto3

# Initialize DynamoDB client
ddb = boto3.client('dynamodb', region_name='ap-south-1')
table_name = "demo-websocket-app"

def lambda_handler(event, context):
    try:
        # Delete item from DynamoDB table
        ddb.delete_item(
            TableName=table_name,
            Key={
                'connectionId': {'S': event['requestContext']['connectionId']}
            }
        )
    except Exception as e:
        return {
            'statusCode': 500,
            'body': str(e)
        }

    return {
        'statusCode': 200
    }
- Click on the deploy once you are done with the changes
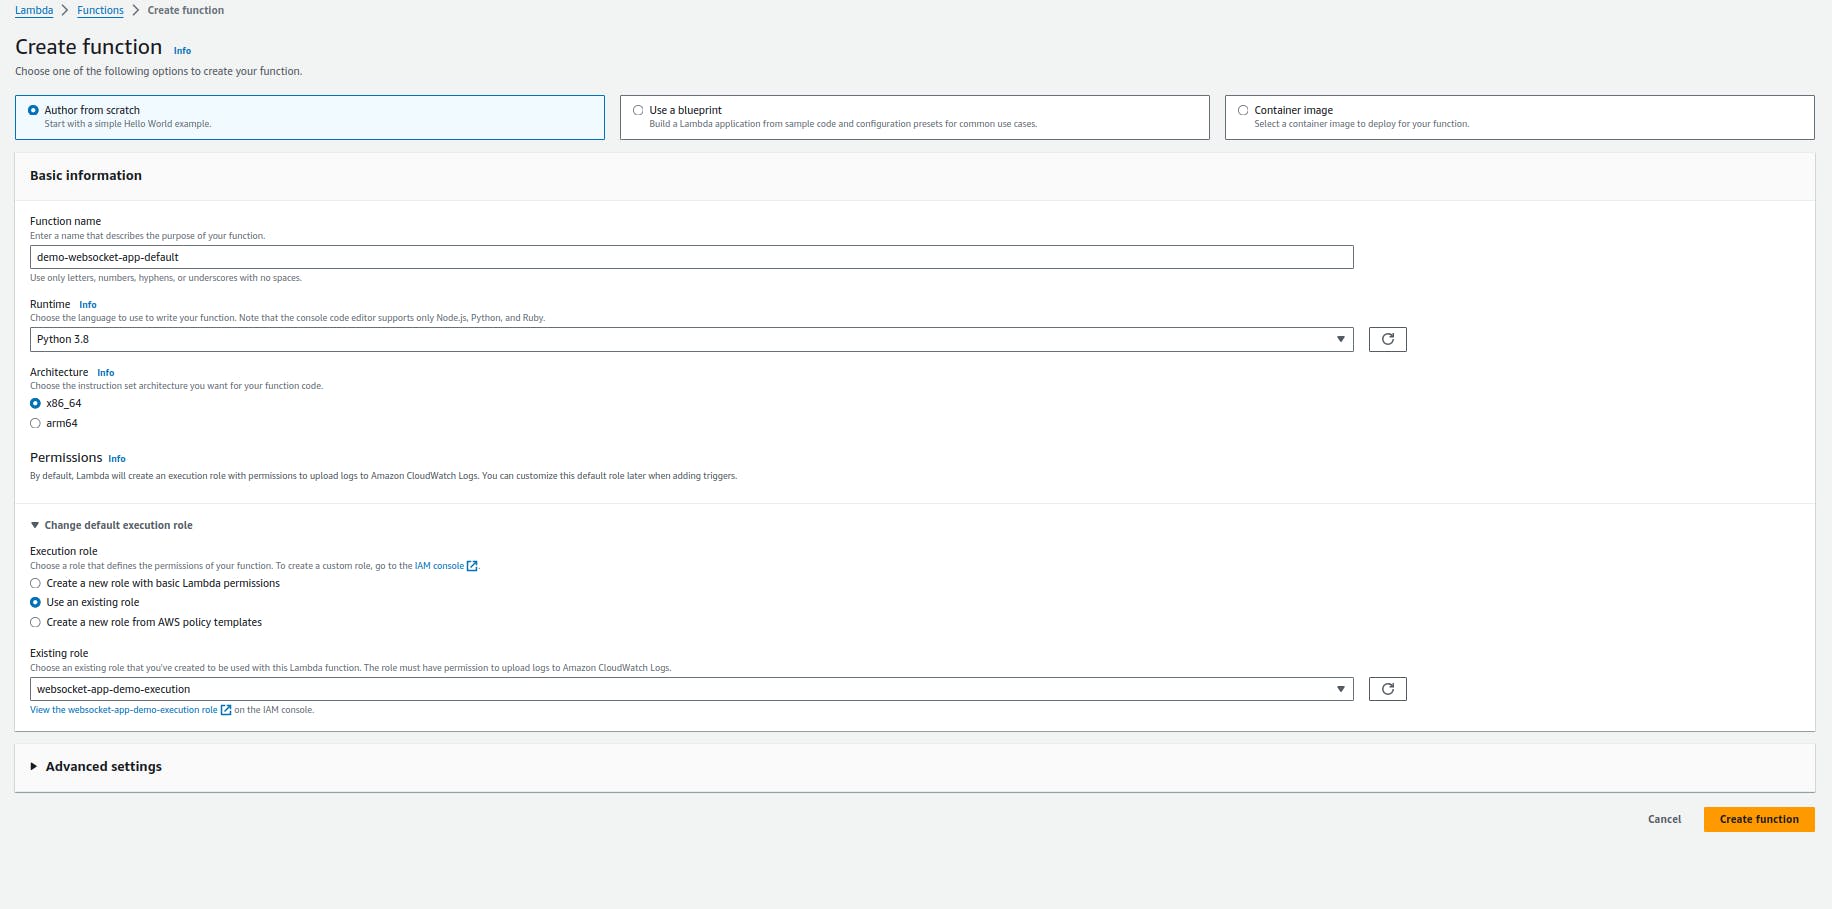
Step 5: Create Default Lambda Function
Create Lambda with name demo-websocket-app-default to handle default route. whenever there is no match of any route/action, this default lambda will get call through default route.
Select role websocket-app-demo-execution
Select Language as python 3.8
Write down below code in lambda_function.py which will accept connection id from event and return appropriate message to connected user who is trying to send message to different route which is not valid.
import boto3

# Initialize AWS SDK
client = boto3.client('apigatewaymanagementapi', endpoint_url='https://<YOUR_APIGATEWAY_ID>.execute-api.ap-south-1.amazonaws.com/production')

def lambda_handler(event, context):
    try:
        connection_id = event['requestContext']['connectionId']

        # Get connection information
        connection_info = client.get_connection(ConnectionId=connection_id)

        # Add connection ID to connection information
        connection_info['connectionID'] = connection_id

        # Send message to connection
        client.post_to_connection(
            ConnectionId=connection_id,
            Data='Use the sendmessage route to send a message. Your info:' + str(connection_info)
        )
    except Exception as e:
        print(e)
        return {
            'statusCode': 500,
            'body': str(e)
        }

    return {
        'statusCode': 200
    }
Click on the deploy once you are done with the changes
You can see we have mentioned YOUR API GATEWAY ROUTE ID against endpoint parameter in above code. You need to replace this with exact API gateway route id once we deploy our API gateway in next steps
Step 6: Create Send Message Lambda Function
Create Lambda with name demo-websocket-app-sendMessage to handle sendMessage route (custom route). Whenever client needs to send message to server, this lambda is going to call via sendMessage route.
Select role websocket-app-demo-execution
Select Language as python 3.8

Write down below code in lambda_function.py which will accept connection id and send out message to the connected client by searching inside dynamodb.
import json
import boto3

ddb = boto3.client('dynamodb', region_name='ap-south-1')
apigateway = boto3.client('apigatewaymanagementapi', region_name='ap-south-1')

def lambda_handler(event, context):
    try:
        connections = ddb.scan(TableName='demo-websocket-app')['Items']
    except Exception as e:
        return {
            'statusCode': 500
        }

    api_endpoint = f"{event['requestContext']['domainName']}/{event['requestContext']['stage']}"
    callback_api = boto3.client('apigatewaymanagementapi', endpoint_url=f"https://{api_endpoint}")

    message = json.loads(event['body'])['message']

    send_messages = []
    for connection in connections:
        if connection['connectionId'] != event['requestContext']['connectionId']:
            try:
                callback_api.post_to_connection(
                    ConnectionId=connection['connectionId']['S'],
                    Data=json.dumps({'message': message})
                )
            except Exception as e:
                print(e)

    return {
        'statusCode': 200
    }
- Click on the deploy once you are done with the changes
Step 7: Create API for Websocket
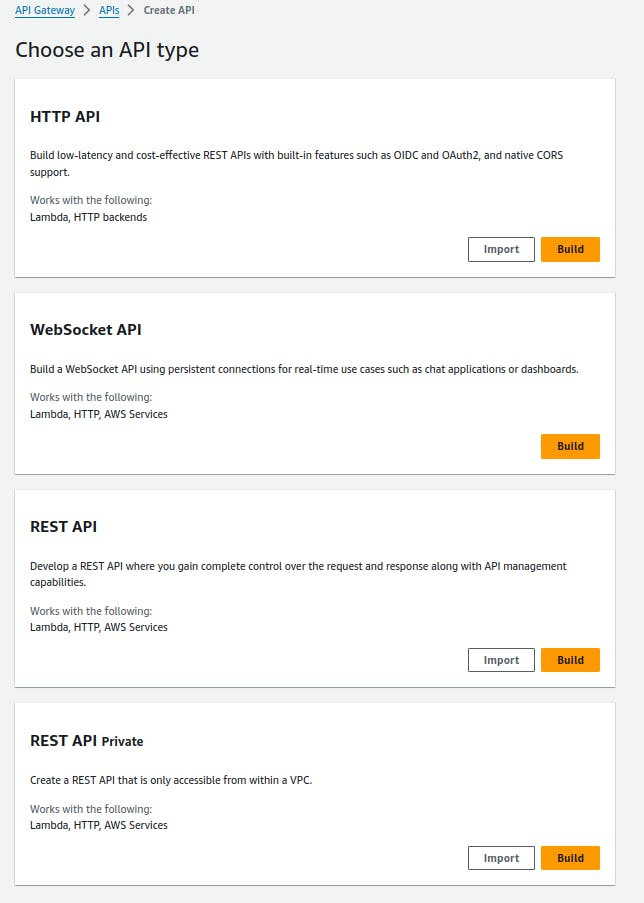
Search for API gateway service on AWS console
Click on create API
Select WebSocket API build
provide API name as demo-websocket-app
provide route expression as request.body.action from which it will identify where to route. eg. If you want to send message then in request along with request body you will send action: "sendMessage". Request payload is going to be like { "action" : "sendMessage", "message" : "<YOUR CUSTOM MESSAGE>" }.
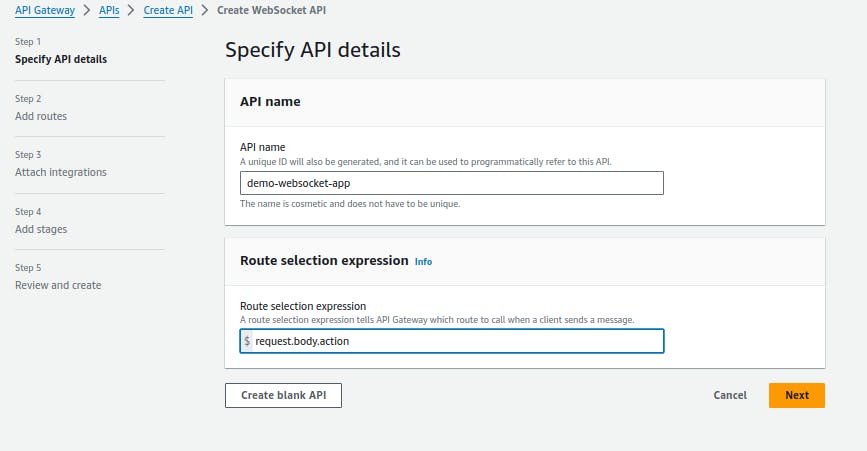
click on Next
in 2nd step you need to add connect, disconnect, default and custom route as below and click on Next.

In 3rd step select Lambda as Integration type for every route. Select respective Lambda function to every route. $connect -> demo-websocket-app-connect, $disconnect -> demo-websocket-app-disconnect, $default -> demo-websocket-app-default and sendMessage -> demo-websocket-app-sendMessage

set stage name as production and click on Next

Click on Create and deploy by reviewing all the information

This will take few seconds, wait till the time API gets created and deployed.

Now go to stages from left side Menu option
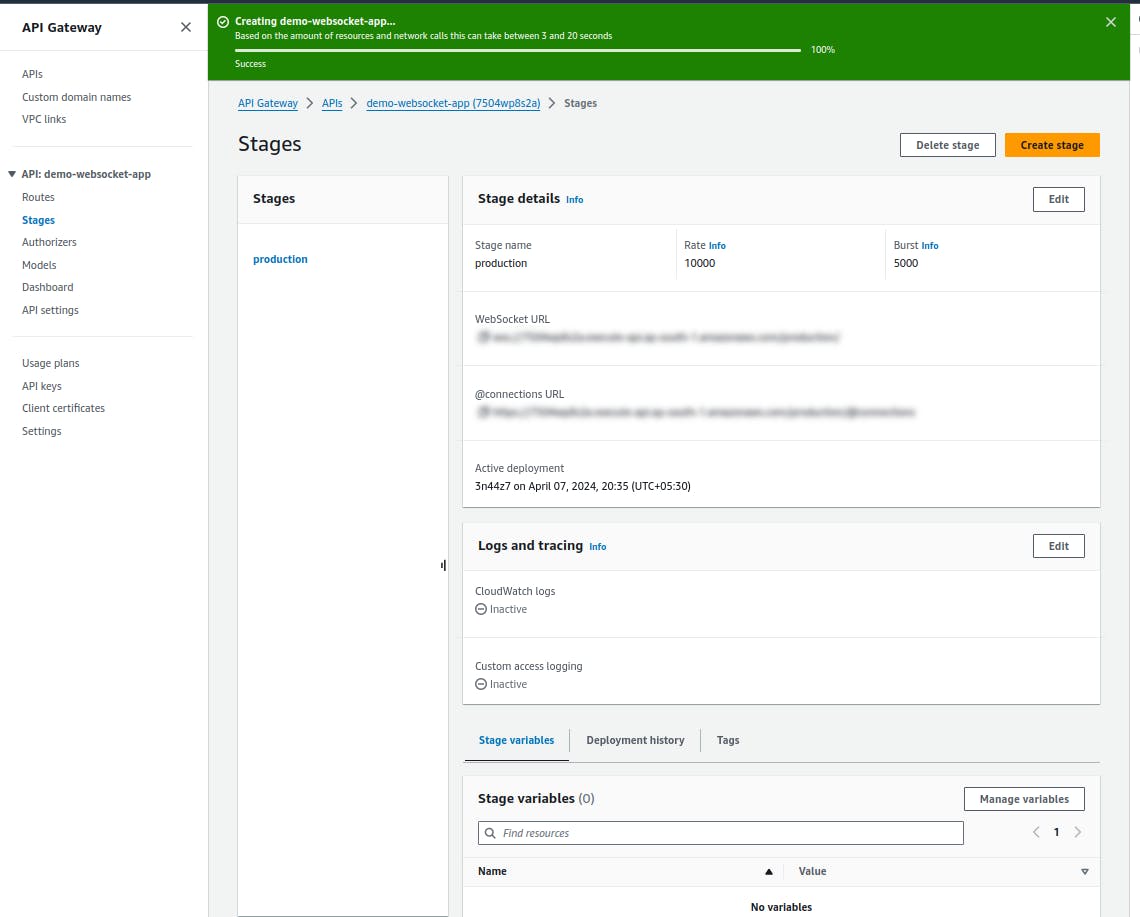
You can see Websocket URL. You can note down this URL to establish connection
Step 8: Test websocket
We will use simple java script program to test it.
<!DOCTYPE html>
<html lang="en">
<head>
    <meta charset="UTF-8">
    <meta name="viewport" content="width=device-width, initial-scale=1.0">
    <title>WebSocket Chat</title>
    <style>
        #chat-box {
            height: 300px;
            width: 400px;
            border: 1px solid black;
            overflow-y: scroll;
            margin-bottom: 10px;
        }
    </style>
</head>
<body>
    <div id="chat-box"></div>
    <input type="text" id="message-input" placeholder="Type a message...">
    <button onclick="sendMessage()">Send</button>
    <button onclick="closeConnection()">Close</button>

    <script>
        const chatBox = document.getElementById('chat-box');
        const messageInput = document.getElementById('message-input');
        let ws;

        function initWebSocket() {
            ws = new WebSocket('wss://<YOUR_API_GATEWAY_ID>.execute-api.ap-south-1.amazonaws.com/production/'); // Change the WebSocket endpoint as needed

            ws.onopen = () => {
                console.log('WebSocket connected');
            };

            ws.onmessage = (event) => {
                console.log("on message");
                console.log(event);
                const message = event.data;
                displayMessage(message);
            };

            ws.onclose = () => {
                console.log('WebSocket disconnected');
                //initWebSocket();
            };

            ws.onerror = (error) => {
                console.error('WebSocket error:', error);
            };
        }

        function closeConnection() {
            ws.close();
        }

        function displayMessage(message) {
            const p = document.createElement('p');
            p.textContent = message;
            chatBox.appendChild(p);
            chatBox.scrollTop = chatBox.scrollHeight; // Auto-scroll to bottom
        }

        function sendMessage() {
            console.log("sendMessage");
            const message = messageInput.value;
            console.log(message);
            if (message.trim() !== '') {
                ws.send(JSON.stringify({"action": "sendMessage", "message": message}));
                messageInput.value = '';
            }
        }

        initWebSocket();
    </script>
</body>
</html>
You need to replace <YOUR_API_GATEWAY_ID> with your newly created API gateway route demo-websocket-app

You can test by sending any message. Check your respective lambda logs like demo-websocket-app-connect, demo-websocket-app-disconnect and demo-websocket-app-sendMessage.
Conclusion
In conclusion, setting up WebSocket communication with AWS API Gateway and Lambda provides a scalable and cost-effective solution for building real-time applications. By following the step-by-step guide outlined above, you can leverage the power of serverless architecture to handle WebSocket connections and events seamlessly.
WebSocket communication with AWS API Gateway and Lambda opens up a world of possibilities for building real-time applications with ease, flexibility, and scalability on the AWS cloud platform. Whether it's chat applications, live data dashboards, or multiplayer games, this combination provides a robust foundation for delivering seamless real-time experiences to your users.