


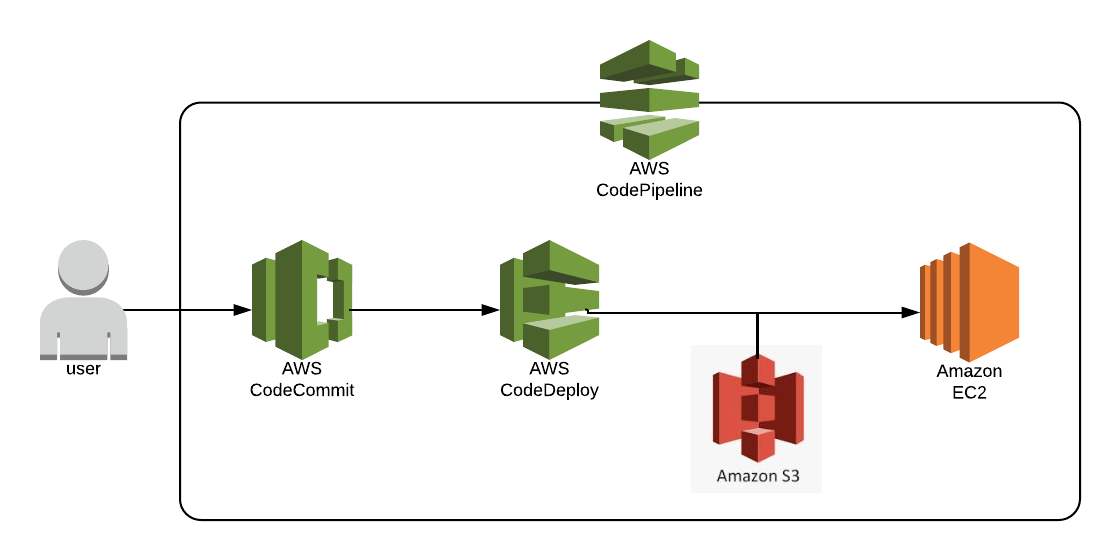
In modern software development, deploying applications manually is slow, error-prone, and inefficient. Continuous Integration and Continuous Deployment (CI/CD) automate this process, ensuring faster, reliable, and consistent deployments. AWS CodePipeline is a managed service that helps you design and automate the entire CI/CD process seamlessly.
Benefits of AWS CodePipeline:
Automation: Automates the build, test, and deploy phases.
Consistency: Ensures consistent deployment across environments.
Speed: Speeds up software delivery with automated triggers.
Integration: Natively integrates with AWS services like CodeBuild, CodeDeploy, Lambda, and third-party tools (e.g., GitHub, Jenkins).
Scalability: Scales with your development process without manual intervention.
What Are We Going to Build?
Python Flask Application
- We will create a simple Python Flask application. You can use this guide for any other application in your preferred language.
Push to GitHub and Integrate with AWS
- The application's source code will be stored in GitHub, and we will connect it to AWS CodePipeline.
Create a Docker Image and Push to ECR
- Using the AWS Build Stage, we will pull latest code from GitHub and create a Docker image for the application and push it to an ECR repository.
Deploy the Docker Image to EC2 Using CodeDeploy
- The AWS Deploy Stage will pull the latest Docker image from ECR and deploy it to an EC2 server.
Automate the Entire Process Using AWS CodePipeline
- Finally, we will orchestrate the whole process using AWS CodePipeline for a seamless and automated CI/CD experience.
Pre-Requisites
Before setting up the pipeline, ensure the following:
1. AWS Account Setup
- You need an AWS account with administrative privileges.
2. EC2 Instance Requirements
Launch an EC2 instance:
Select an Amazon Linux 2 AMI.
Tag the instance with Name: Flask-App.
Assign a Role to the EC2 instance with:
AmazonEC2ContainerRegistryReadOnly policy (to pull images from ECR).
AmazonS3ReadOnlyAccess policy (to access deployment files from S3).
Install Docker:
  sudo yum update -y
  sudo yum install -y docker
  sudo service docker start
Add the EC2 user to the Docker group:
sudo usermod -aG docker ec2-user
3. Install CodeDeploy Agent
Ensure the CodeDeploy agent is installed on the EC2 instance:
SSH into the EC2 instance.
Install the CodeDeploy agent:
 sudo yum install -y ruby wget
 wget https://aws-codedeploy-<region>.s3.<region>.amazonaws.com/latest/install
 chmod +x ./install
 sudo ./install auto
Start the CodeDeploy agent:
sudo service codedeploy-agent startEnsure the agent starts automatically on reboot:
sudo systemctl enable codedeploy-agent
4. AWS Services Setup
ECR Repository: Create an ECR repository to store your Docker images:

Create GitHub Connection
Go to AWS Code Pipeline service
Under settings navigate to connections. Click on Create connection

By selecting GitHuB and specifying connection name, click on Connect to GitHub
Click on install new App. This will redirect to github login page if you are not logged in. Once you are logged in it will ask for repository permission for newly added AWS app on your GitHub account. You can give access to specific repositories or all repositories

Once you clicked on Save it will redirect to AWS console and then you can click on Connect. Now you can use this connection in your AWS console to pull your code.
Sample Code
You can refer https://github.com/snmkr/flask-app project to get all sample code.
Upload your code on your own repository.
Pipeline Components Overview
AWS Code Build: Build a Docker image and push it to ECR.
AWS Code Deploy: Deploy the latest Docker image to EC2.
AWS Code pipeline: Automate build to deploy stages
Step-by-Step Guide
Step 1: AWS Code build
Navigate to Codebuild and click on Build projects
Click on create project. Provide name as flask-app-build.

Under source section select GitHub as source provider. Since we are connecting to our own GitHub repo, click on Custom source credential.
Under connection select the connection name from dropdown which you have created in above Create GitHub Connection step
Select your repository name from repository dropdown

Select default environment section. Please note that whenever AWS build gets triggered, Job requires either EC2 (instance type can be configure like on demand or reserved) or Lambda.
Under BuildSpec section you have two options. Either you can give your own commands or file with name buildspec.yml should be present in your source code. In this blog we are going with second option which will give more flexibility.

Click on Create build project.
This project will create a role with name “codebuild-flask-app-build-service-role”. Navigate to this role from IAM service.

Since we are pushing our Docker image to ECR, where ECR permission needs to be given to this role which we will see later in the blog. You can attached below policy to one of the policies in defined role
{
    "Resource": [
        "*"
    ],
    "Effect": "Allow",
    "Action": [
        "ecr:*",
        "sts:*"
    ]
}

Now below is the buildspec.yml which defines the steps for building and deploying your application in the AWS CodeBuild phase. It is written in YAML and contains phases and other configurations that CodeBuild uses during execution.
    version: 0.2

    env:                                          # env variables to run build
      variables:
        AWS_REGION: "ap-south-1"                   # Replace with your AWS Region
        REPOSITORY_NAME: "flask-app"
        IMAGE_TAG: "latest"                       # Use a simple tag like "latest"

    phases:
      pre_build:                # first phase to execute
        commands:
          - echo Fetching AWS account ID...
          - ACCOUNT_ID=$(aws sts get-caller-identity --query Account --output text)
          - IMAGE_URI="${ACCOUNT_ID}.dkr.ecr.${AWS_REGION}.amazonaws.com/${REPOSITORY_NAME}:${IMAGE_TAG}"
          - echo Logging in to Amazon ECR...
          - aws ecr get-login-password --region $AWS_REGION | docker login --username AWS --password-stdin ${ACCOUNT_ID}.dkr.ecr.${AWS_REGION}.amazonaws.com
          - echo Building the Docker image...
      build:                    # phase to build your code (in this case image)
        commands:
          - docker build -t ${IMAGE_URI} .
      post_build:               # last phase where you take an action after build
        commands:
          - echo Pushing the Docker image to ECR...
          - docker push ${IMAGE_URI}
          - echo Build and push completed.

    artifacts:                # what needs to go in build artifact
      files:
        - '**/*'
Once the build is successful, your artifact will go yo s3 bucket. (bucket will get create once you create build project)
Step 2: AWS Code deploy
Navigate to Codedeploy and click on Applications from menu. AWS code deploy
Click on Create Application by selecting EC2/On-premises. Currently AWS supports EC2/On-premises, Lambda and ECS options to deploy your code. In this blog we will see EC2/on-premises.

Once the application gets created, click on create deployment group

- Provide deployment group name and AWSCodeDeploy role name

Under Environment configuration you have 3 options for In-Place deployment
Amazon EC2 Auto Scaling groups: If you would like to deploy your build with Autoscaling
Amazon EC2 instances: Build will get deployed on mentioned tag server on EC2
On-premises instances: Build will get deployed on mentioned tag server on onpremises servers
In this blog we will see Amazon EC2 instances deployment. Inside tag enter “Name” as tag name and “Flask-App” as value. This tag must be mentioned in your running instance as a prerequisite.
Note: as I have mentioned in prerequisite code deploy agent must install in your EC2 which use to deploy your build.

For Blue/Green deployment option as well you will find above 3 options
You can mentioned how to redirect traffic once the deployment is done. Also you need to mention EC2 is under loadbalancer or not. In this example we are not going with Loadbalancer.

Click on Create deployment group
Step 3: AWS Code Pipeline
In this component we will automate our build and deployment
Navigate to AWS code pipeline AWS Code Pipeline
Click on Create pipeline and click on Custom build pipeline

Provide pipeline name
In step 3 select source provider as GitHub (via GitHub app). Select GitHub connection, repository name and the branch name which AWS would like to pull from it.
Under Trigger section you have 3 options
No filter: Starts your pipeline on any push and pull request events.
Specify filter: Starts your pipeline on a specific filter and clones the exact commit. like Pull request or push on specific branch etc.
Do not detect changes: Don't automatically trigger the pipeline.
We are going with First option - No filter. It means as soon as you push your code on main branch, pipeline will get trigger automatically.
In step 4 select other build providers. Select AWS code build and select your build project flask-app-build

Click on Next
In step 5 select AWS codedeploy as Deploy provider. Select your application name and deployment group name. Click on Next.

Click on Create once you are done with review.
As soon as you create your codepipeline, your pipeline will get triggered.
If everything is good then your pipeline should be success. It means your latest code is deployed on respective server.

You can also see deployment phases/events on each EC2 server under Deploy-View details
Conclusion
This blog walks through setting up a complete CI/CD pipeline using AWS CodePipeline for deploying a Dockerized Flask application. With the power of CodePipeline, CodeBuild, and CodeDeploy, you can achieve fully automated, reliable, and scalable deployments tailored to your application needs.